Testing in Python
I've written this almost a year back. I decided to give an (almost) permanent home here. Since I wrote this mostly for myself, the structure of the blog is not great. However, I believe the content is quite useful for me.
Python Testing in Visual Studio Code
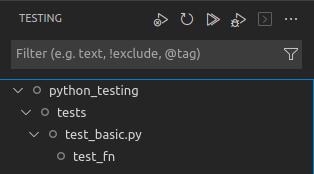
The Python extension for VSCode (developed by Microsoft) makes it easier to navigate the testing process (especially when there a many). If you have the extension installed, you should be able to see a beaker icon on the side panel.
![]()
Some advantages of using this capability over using pytest CLI are:
-
Running a specific test is easier
-
A tree view of all the test folders, test files, and test functions is displayed in the left panel. You can hover over each item to run (or) run&debug all the test cases that are lower in the hierarchy of the hovered item.
-
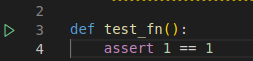
We can hover over
test_fnand run that test alone with a button click instead of doing it with the pytest CLI like this. Since I struggle to remember the commands, button clicks are faster. -
You can also run a test from the opened file in VSCode itself. You will see a run icon on the left of each discovered test function
-
-
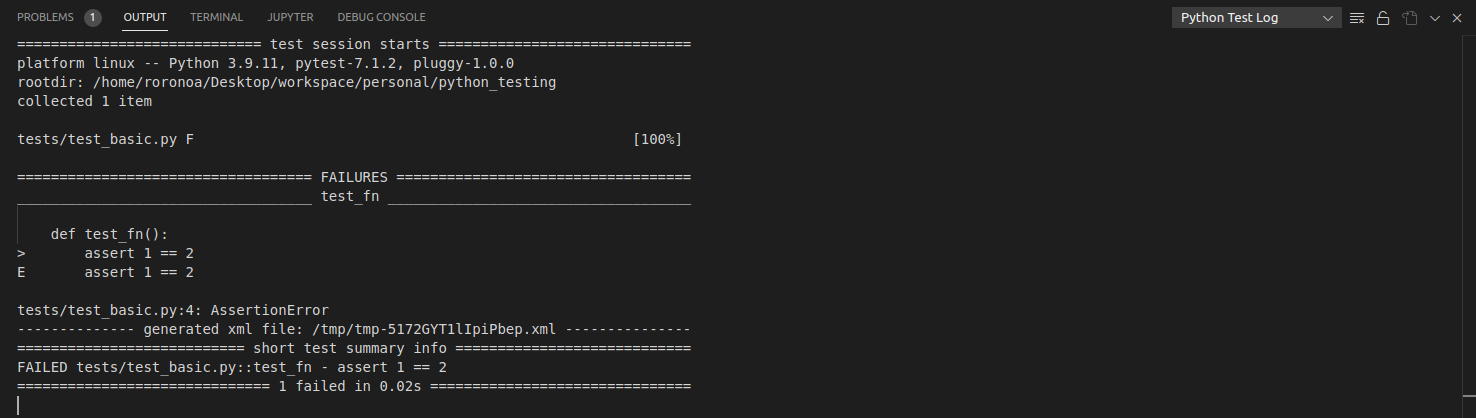
You can view the entire output of the testing log.
- You can switch to the “OUTPUT“ section of the integrated terminal and select “Python Test Log“ to view the entire output.
- You can switch to the “OUTPUT“ section of the integrated terminal and select “Python Test Log“ to view the entire output.
-
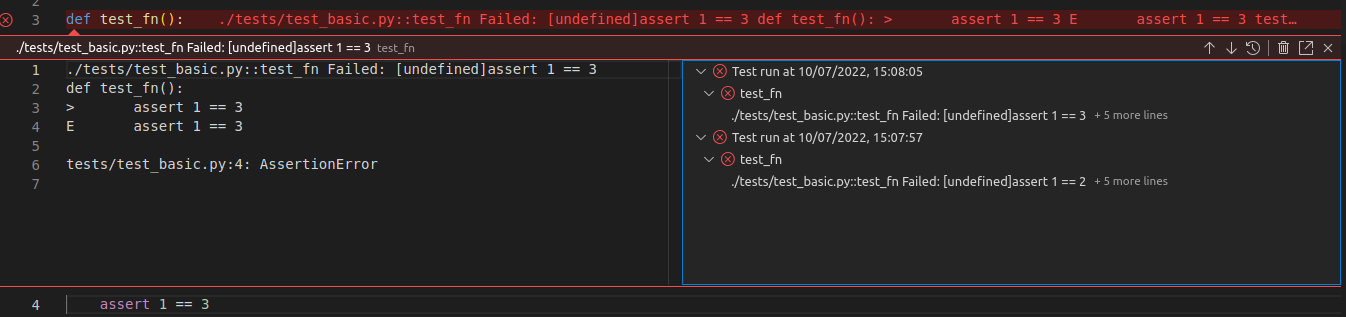
View and compare the Test History of a test case easily
-
If a particular test case has failed now, we can see the test result history in the gutter decorations that will be displayed for each failed test case
-
Note: You can learn more about Python testing in VSCode here.
Monkey Patching
We shall see how we can leverage monkey patching to test functions that are expected to spit out different values on each run.
Monkey patching fixture
Let’s say we have the following function
import uuid

def greet(greeting: str) -> str:
    return greeting + str(uuid.uuid4())
Let’s try to create a test for this function
import uuid

def test_greet(monkeypatch: MonkeyPatch):
    sample_uuid = str(uuid.uuid4())
    greeting = "Hello "
    assert greeting + sample_uuid == greet(greeting)
Such a test will not pass. You will get an error something like this:
./tests/test_basic.py::test_greet Failed: [undefined]AssertionError: assert 'Hello 2639f2...-87ef386cae27' == 'Hello a1436c...-d3b69af84d05'
  - Hello a1436ca0-cf34-47c1-8aca-d3b69af84d05
  + Hello 2639f240-b792-45b6-be49-87ef386cae27
monkeypatch = <_pytest.monkeypatch.MonkeyPatch object at 0x7faf98410730>

    def test_greet(monkeypatch: MonkeyPatch):
        sample_uuid = str(uuid.uuid4())
        # monkeypatch.setattr(uuid, "uuid4", lambda: sample_uuid)
        greeting = "Hello "
>       assert greeting + sample_uuid == greet(greeting)
E       AssertionError: assert 'Hello 2639f2...-87ef386cae27' == 'Hello a1436c...-d3b69af84d05'
E         - Hello a1436ca0-cf34-47c1-8aca-d3b69af84d05
E         + Hello 2639f240-b792-45b6-be49-87ef386cae27

tests/test_basic.py:10: AssertionError
This is because the UUID generated in the test_greet function is 2639f240-b792-45b6-be49-87ef386cae27 whereas the UUID generated in the greet function is a1436ca0-cf34-47c1-8aca-d3b69af84d05
This is fair because that is how uuid4() works. Every time it is supposed to return us a unique string.
So how can we test something that keeps changing every time it gets called? This is exactly why pytest fixtures are useful. We will now use the Monkey Patching fixture.
Let’s modify the test function like this:
from pytest import MonkeyPatch
import uuid

def test_greet(monkeypatch: MonkeyPatch):
    sample_uuid = str(uuid.uuid4())
    monkeypatch.setattr(uuid, "uuid4", lambda: sample_uuid)
    greeting = "Hello"
    assert greeting + sample_uuid == greet(greeting)
Here is what we did
-
We made the
test_greetfunction accept a pytest fixture called monkey-patch.- Note: The argument has to be
monkeypatchonly. Any other variant or another word will not work.
- Note: The argument has to be
-
We modified the
uuid4function with our own implementation.- The original implementation of
uuid4()is
def uuid4(): """Generate a random UUID.""" return UUID(bytes=os.urandom(16), version=4)- After the line
monkeypatch.setattr(uuid, "uuid4", lambda: sample_uuid)it will behave like this
def uuid4(): return "2639f240-b792-45b6-be49-87ef386cae27" # the contents of sample_uuid - The original implementation of
-
Let’s analyse point 2 a bit further
monkeypatch.setattris helping us replace the implementation ofuuid4()function from theuuidmodule.- Now every time we call
uuid4(), it will always give ussample_uuid(which we hardcoded to "2639f240-b792-45b6-be49-87ef386cae27") - After the monkey patch is applied, when we call the
greetfunction (in the assert statement of thetest_greetfunction), we get2639f240-b792-45b6-be49-87ef386cae27from the modifieduuid4()function
-
It is important to note that the effect of monkey patching wears off as soon as we exit the test function. That is to say if we call
uuid.uuid4()in another test function, we should be expecting the original behavior ofuuid.uuid4()to occur.def test_greet(monkeypatch: MonkeyPatch): # no error because uuid4 is modified to return a mock value sample_uuid = str(uuid.uuid4()) monkeypatch.setattr(uuid, "uuid4", lambda: sample_uuid) greeting = "Hello " assert greeting + sample_uuid == greet(greeting) def test_greet2(): # error will occur becuse uuid4 is not modified in this test. # The affect of monkeypatch only applies to the test function # where the fixture is applied sample_uuid = str(uuid.uuid4()) greeting = "Hi " assert greeting + sample_uuid == greet(greeting)
Special Mention
- This approach can be used to test anything that keeps changing every time we run it. Examples: Functions that involve random integers and timestamps.
- Monkey patching doesn’t work if a module has immutable objects or attributes. Example: datetime.datetime. We will have to patch the entire datetime.datetime class.
- You can also use freezegun to freeze datetime values for testing purposes.
Monkey Patching Outside Testing
Monkey patching is not unique to testing. Not even unique to Python. This has the best explanation of what it is.
One way we can use this in our day-to-day work is:
- Let’s say, we are facing an issue with a function’s implementation coming from an external library.
- Ideally, the owners of the library have to fix the bug in, write a new test case, wait for the build to pass, and release a new version. After that, we can upgrade the library's version in our codebase.
- However, sometimes, there is no time to die. In such exceptional cases, we can monkey-patch the problematic function with our implementation and then ship our code.
Things to be careful about Monkey Patching
There are serious drawbacks to monkey-patching:
- If two modules attempt to monkey-patch the same method, one of them (whichever one runs last) "wins" and the other patch has no effect. (In some cases, if the "winning" monkey-patch takes care to call the original method, the other patch(es) may also work; but you must hope that the patches do not have contradictory intentions.)
- It creates a discrepancy between the source code on the disk and the observed behavior. This can be very confusing when troubleshooting, especially for anyone other than the monkey-patch's author. Monkey-patching is therefore a kind of antisocial behavior.
- Monkey-patches can be a source of upgrade pain when the patch makes assumptions about the patched object which are no longer true.
This is the source for the above points.
Test Performance and Coverage
Coverage
pytest --cov=slu --cov-report html --cov-report term:skip-covered tests/
The above statement gives us a coverage report. For each file, we can see the test report below: 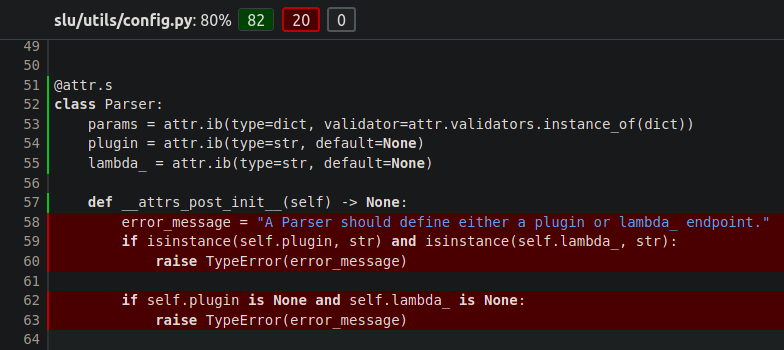
The green lines signify that the tests have touched these lines. It is important to note that it does not mean every possible scenario has been tested for these lines. The red lines are the ones that none of the test functions reached.
Pinning Down Slowest Tests
You can pass the number with --durations
pytest --durations=0 — Show all times for tests and setup and teardown

pytest --durations=1 — Just show me the slowest test

pytest --durations=50 — Slowest 50, with times, … etc
Usage:
# example command
pytest --durations=3
# example output

=============================================================================== slowest 3 durations ===============================================================================
0.39s call     tests/test_controller/test_predict_api.py::test_utterances[116918a3bc5138ccced42e825522d0397d5c29327290c0f912d4a5ade97cdf14-payload0]
0.37s call     tests/test_controller/test_predict_api.py::test_utterances[593e45693169a78ef9ac329fd2adee8f6912b370196fefb949fd41348674cdcc-payload3]
0.32s call     tests/test_controller/test_predict_api.py::test_utterances[1b464d8c8d00d0d78915ccb3362b2339c6545fac33c3d7b018096690302b671b-payload2]
source: here
Test Performance Visualisation
There is a 3rd party library called Pytest-benchmark which provides a fixture for accurately benchmarking a test case.
You can use it like this:
from pytest_benchmark.fixture import BenchmarkFixture

def test_greet(monkeypatch: MonkeyPatch, benchmark: BenchmarkFixture):
    sample_uuid = str(uuid.uuid4())
    monkeypatch.setattr(uuid, "uuid4", lambda: sample_uuid)
    greeting = "Hello "
    assert greeting + sample_uuid == benchmark(greet, greeting)
When we run pytest:
============================= test session starts ==============================
platform linux -- Python 3.9.11, pytest-7.1.2, pluggy-1.0.0
benchmark: 3.4.1 (defaults: timer=time.perf_counter disable_gc=False min_rounds=5 min_time=0.000005 max_time=1.0 calibration_precision=10 warmup=False warmup_iterations=100000)
rootdir: /home/roronoa/Desktop/workspace/personal/python_testing
plugins: benchmark-3.4.1
collected 1 item

tests/test_basic.py .                                                    [100%]

-------------- generated xml file: /tmp/tmp-5172mcnCmBQDSfPj.xml ---------------

------------------------------------------------------ benchmark: 1 tests -----------------------------------------------------
Name (time in ns)          Min          Max      Mean    StdDev    Median      IQR   Outliers  OPS (Mops/s)  Rounds  Iterations
-------------------------------------------------------------------------------------------------------------------------------
test_greet            340.0019  16,096.9976  395.4294  117.2442  390.0022  37.9987  4900;5713        2.5289  168663           1
-------------------------------------------------------------------------------------------------------------------------------

Legend:
  Outliers: 1 Standard Deviation from Mean; 1.5 IQR (InterQuartile Range) from 1st Quartile and 3rd Quartile.
  OPS: Operations Per Second, computed as 1 / Mean
============================== 1 passed in 1.55s ===============================
To visualize it:
pytest --benchmark-histogram
This will provide an SVG file that has the histogram of the performance. Pytest-benchmark runs the code several times to give us a median value. 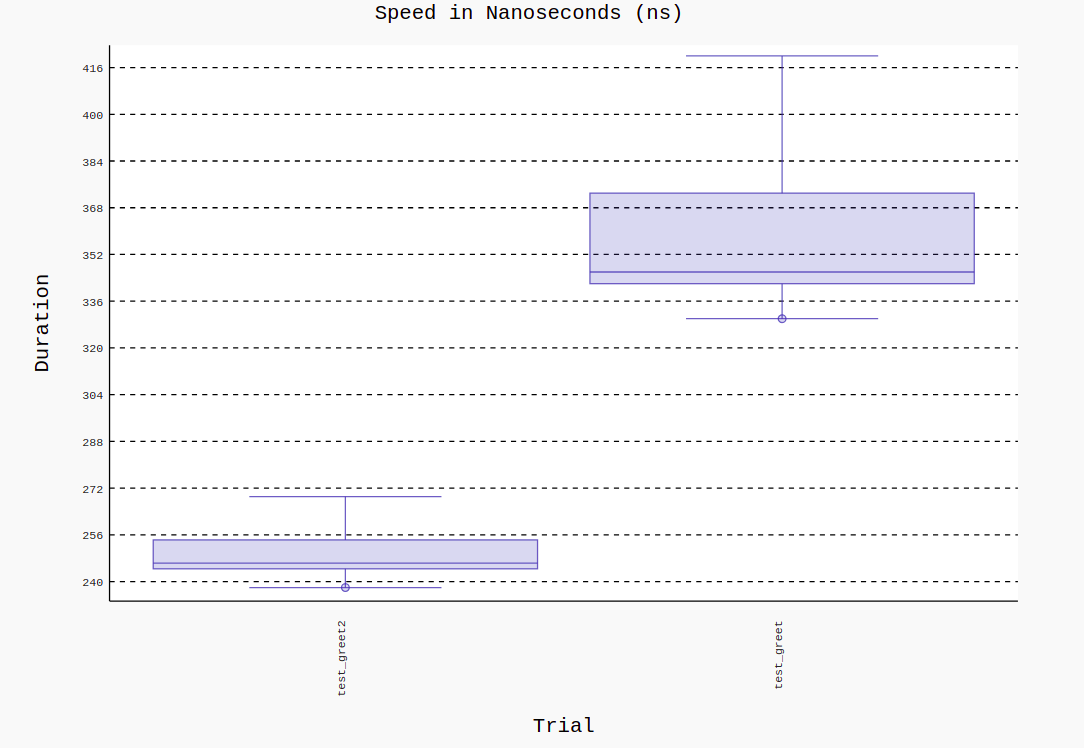
Note: Pytest-benchmark gives us an accurate picture as opposed to finding the difference between the times at the start and end of a function. It accounts for asynchronous code too.
The Importance of Negative Test Cases
Some time ago, I was watching this video(The Most Common Cognitive Bias) by Veritasium and I realized that the learnings from the video can directly be applied to writing tests for code.
Here is what I gathered:
- There was a theory that all swans are white. So every white swan that you come across makes you think, “Yeah the theory is pretty good”.
- People in the video are asking a question for which they expect the answer to be yes.
- But you want to get to the NOs because that is much more information for you than the yes. A “yes” confirms what you are thinking, and a “no” breaks what you are thinking.
- The scientific way to prove that something is true is to constantly try and disprove it. Only when we are not able to disprove it, we must be getting closer to something true.
- If you think something is true, you need to try as hard as you can to disprove it. That is the only way to not fool yourself. Every "no" is part of the answer leading to "yes".
- Cognitive Bias is such that humans generally want to confirm the truth with similar data (pattern matching), not get closer to the truth by proving false data (edge case detection). Both have value, but the latter is critical. (a comment on the same video)
Applying it to Writing Tests
Trying to apply what we learned above: Suppose there is a function that takes in a list of numbers and returns True/False based on if the numbers follow a certain pattern or not. Considering the code implementation as a black box (which can happen if you are new to the project or if the code is hard to read), how would you go ahead and write the test cases?
- You can write a test case with 2, 4, and 8 and you get
Trueas the result. This is a positive test case. - Now you can write N such test cases where you expect
Trueas the result. Let’s say you think the pattern is “multiply by 2“. Multiple positive test cases will strengthen your belief that you’ve figured out the pattern. But also this can lead to bias. - Instead, once you have a hypothesis, the best way to verify it is to disprove it.
- So as the second test case, you can write 2, 4, and 7 and expect to get
False. Surprise! you getTrueagain. This negative test case helped you avoid cognitive bias. - After some iterations, you’ve formed a hypothesis that the pattern is “numbers in ascending order“. You write some positive test cases. Now you have a stronger hypothesis. Then you write a negative test case (input: 2, 5, 1) and expect to get
False. Once your negative test case also passes, that’s when you can be more confident about your hypothesis. - Positive and Negative test cases together give us double confirmation of our hypothesis.
Misc Learnings
- If your function code is reading any value from environment variables, configuring pytest will have issues. To solve this, you can create a
.envfile with all the environment variables. Post this, you can configure pytest with VSCode python. - Every statement in a Makefile runs in separate sessions.